Home-Grown Microgreens Are Still The Best Choice I’ve Made
I didn’t come to the idea of growing my own microgreens right away. It started when I read that growing lettuce on a commercial scale in Canada is simply not profitable — the climate, heating, and lighting all make it too expensive. So even the greens we see on the shelf are shipped in from the south — mostly from California.
That made me wonder: how many days does it spend in transit? What do they treat it with to keep it fresh? And most of all — why should I be paying for logistics, packaging, preservation and all the rest, if I can grow the same thing at home?
At first, I planned to just grow sprouts in jars. A single jar gives ready-to-eat sprouts in about four days. I had done that before — it’s convenient: if you rotate four jars, you get fresh food every day. But then I came across information about microgreens and realized it’s even more efficient: they take a bit longer to grow, but you need fewer seeds and get more product in the end.
That’s when I started learning how to grow them properly. I began by testing different crops one by one, then moved on to making balanced mixes that could grow together. Within four weeks, I already had enough greens for the family every day. And a couple weeks later, I had a small farm set up on four shelves, reliably producing about half a kilo of microgreens per day.
Over time, I put together a seeding schedule — which crops to sow and when — to keep things not only consistent, but also varied. And at that point, I started digging deeper: what nutrients each variety contains, how they differ, and why rotation makes sense.
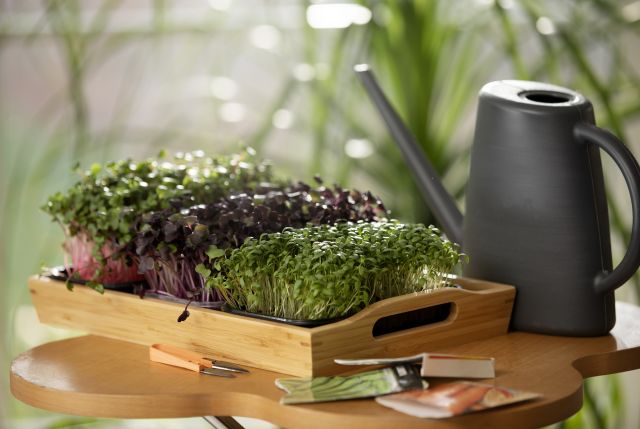
Turned out, none of it was complicated. No greenhouses, no soil. Just 10×20 inch trays, matching bottom trays, water, light, airflow — and after 7 to 14 days, I have a living, nutrient-rich harvest that makes almost any meal fresher, brighter, and more nourishing. Most importantly — I know exactly what’s in it, because I grew it myself.
What Are Microgreens and Why Are They Good for You?
Microgreens are young vegetable or herb seedlings harvested around 7–14 days after germination. They’re not sprouts (which are eaten whole, including the root), and not mature plants either. They’re an in-between stage — the seedlings have developed cotyledons, and sometimes their first true leaves, but are still tender and full of energy.
What makes microgreens special is their dense nutritional profile. At this stage, the plant’s enzymes are active and the growth is fast, which means the concentration of vitamins, antioxidants and micronutrients is significantly higher than in the same plants when fully grown.
According to the USDA and several lab studies, levels of certain vitamins and antioxidants in microgreens can be 4 to 40 times higher than in mature greens of the same species. For more on nutritional value, see the article The Balanced Eating Strategy That Makes You Feel Great, part 2, section: What Microgreens Provide (by Plant Type).
Taste-wise, microgreens often resemble the full-grown version. Radish is sharp, pea shoots are sweet, mustard has a spicy kick. That makes them not only healthy, but also easy to use. Add them to salads, bowls, or just sprinkle on top — and they instantly bring texture, flavor, and color. No more “eating grass” just for the sake of health.
Why Growing Microgreens at Home Is Practical and Safe
Home-growing microgreens doesn’t take much time and gives you full control over the entire process — from seed quality to harvest and storage.

Low Time Commitment
- Daily care takes about 20 minutes in the morning and evening (based on 16 trays across 4 shelves).
- No need to turn lights on or off — everything runs on a timer.
- The main task is to check the water level in the lower tray and top it up if needed. Every couple of days — wipe things down or swap trays if necessary.
- Sowing 4 trays, once every 4 days, takes about 20 minutes: add substrate, level it, moisten, distribute seeds, mist them, and cover with another tray for 1–2 days to speed up germination.
- Harvesting the same 4 trays, also once every 4 days, takes around 20 minutes: cut, pack, remove the used substrate, and wash the trays.
Significant Savings
- One tray yields 150–300 g of microgreens, depending on the crop.
- The cost per tray is about $1.50–2 (seeds, substrate, water, minimal electricity).
- In stores, 50 g of microgreens costs $4–5, which comes out to up to $30 for the same volume. The benefit is clear: growing it yourself is 8–15 times cheaper.
Full Control and Transparency
When you grow microgreens at home, you know everything about them.
What seeds were used — organic or not. What water — filtered or tap. What substrate — certified or just available. What conditions they grew in, whether any fertilizers were used, and if anything was applied to prevent mold. You’re the one making those decisions, so you know exactly what’s in your greens.
In commercial setups, it’s a different story. To preserve crops in high-humidity, high-density environments, trays are often treated with chemicals before seeding. During growth, microgreens may be sprayed with antifungal solutions. Synthetic fertilizers are commonly used. Seeds may be non-organic or even genetically modified. Substrates are often chosen for cost, not quality.
All of this is done not just to cut costs, but also to reduce risk — because mold across hundreds of trays is a real threat. In the end, you get a product that looks like microgreens but, unless it’s explicitly labeled “organic,” could have anything in it.
What About Mold?
Mold is often mentioned as the main risk in microgreen growing, but in practice, it’s easy to avoid. If you use coconut coir instead of soil, never reuse substrate, wash trays thoroughly, stick to bottom watering, and ensure good airflow with fans — indoor humidity doesn’t rise significantly, and the risk of mold stays minimal.
For extra peace of mind, you can treat trays before seeding with a diluted food-grade hydrogen peroxide solution: 40 ml of 3% peroxide per 1 liter of water. It’s simple, safe, and highly effective in reducing the risk close to zero.
Humidity control does matter, of course. But based on my experience, with a relatively small home setup, indoor humidity barely changes. If it does go above 50%, just use a dehumidifier to bring it down.
Freshness Means More Than Just Taste
Even organic microgreens begin losing nutrients quickly after cutting — especially vitamin C and the B-complex group. Within 24 hours, antioxidant levels and enzyme activity start to drop. After 2–3 days in the fridge, microgreens might still look fine, but their nutritional value is significantly lower. Home-grown microgreens are truly fresh — harvested right before eating, they give you the full benefit with no delays.
Equipment for Growing Microgreens
To grow microgreens at home, you’ll need a basic setup — for sowing, care, and harvesting:
- Trays and bottom watering containers — growing trays with holes, and solid ones underneath to hold water
- Growing medium — coconut coir (loose or pressed) is the best option for indoor use
- Seeds — preferably organic, untreated, and specifically intended for microgreens or sprouts
- Shelf or rack (optional) — for vertical stacking of 2×4 ft trays; usually 5 levels, 4 of which are active
- Light — LED grow lights, 4000–6500 K, on for 16–18 hours per day
- Fans — for consistent airflow above the trays
- Weight — to apply gentle pressure during germination (a brick, dumbbell, etc.)
- Timer — for automatic light control
- Spray bottle — to moisten the substrate at planting
- Measuring cup or watering can — for bottom watering
- Scissors or a sharp knife — for clean, precise harvesting
- Scale — for accurately measuring seed amounts before sowing
- Storage containers — for cut greens in the fridge
- Hygrometer and thermometer (optional) — for tracking temperature and humidity
- Cleaning supplies — dish soap, brush, sponge — for regular tray and surface cleaning
- Clean water — especially important during germination and watering
- Natural fertilizer (optional) — e.g. vermicompost tea or a mild organic solution, useful for crops that grow longer than 10–12 days
Microgreen Growing Stages
- Sowing: fill the tray with substrate, evenly distribute dry or pre-soaked seeds, and mist them with water.
- Germination under pressure: place another empty tray on top with a weight (like a brick or dumbbell) to press the seeds into the substrate and promote even germination.
- Blackout phase: keep the trays in darkness for 2–3 days. This can be as simple as covering them and placing them somewhere warm. The goal is to let the shoots stretch and root properly.
- Light phase: once the shoots rise, remove the cover and place them under light (or on a sunny windowsill). Provide around 18 hours of light per day.
- Watering: ideally — bottom watering: pour water into the solid tray under the growing tray. Check water levels 1–2 times a day.
Important: avoid watering from above — soaked seeds may suffocate or rot. - Harvesting: after 7–14 days (depending on the crop), cut the microgreens near the base using a sharp knife or scissors.
- Waste disposal: root and substrate remnants can go into compost or be discarded. Some reuse substrate, but it’s not recommended.
- Equipment cleaning: wash all containers, remove leftover debris, and disinfect if needed — for example, using a food-grade hydrogen peroxide solution. This helps prevent mold in the next batch.
Approximate Growing Schedule for Popular Microgreens
| Crop | Seeding Rate | Pressing Phase | In the Dark | Under Light |
|---|---|---|---|---|
| Radish | 30 g | 2 days | 1 day | 5 days |
| Broccoli | 20 g | 3 days | 2 days | 5 days |
| Kale | 20 g | 3 days | 2 days | 5 days |
| Curled Cress | 16 g | 3 days | 1 day | 6 days |
| Arugula | 15 g | 3 days | 2 days | 5 days |
| Kohlrabi | 20 g | 3 days | 2 days | 5 days |
| Pea | 300 g | 3 days | 2 days | 5 days |
| Pak Choi | 20 g | 3 days | 2 days | 5 days |
| Sunflower | 150 g | 4 days | — | 6 days |
| Red Cabbage | 15 g | 3 days | 2 days | 5 days |
| Amaranth | 8 g | 4 days | 1 day | 5 days |
| Mung Bean | 150 g | — | 5 days | — |
| Fenugreek | 20 g | 3 days | — | 6 days |
If you’re not quite ready to jump into trays, lights, and substrate — there’s a simpler way to start. Sprouts are an excellent first step: faster, easier, and no equipment needed. You’ll already be getting something fresh, living, and nutrient-rich — and saving money in the process.
Sprouts: The Easiest Way to Grow Living Food
Sprouts are perhaps the most accessible and fastest option if you want to grow something fresh and healthy at home. This is not microgreens — no soil, no light, no trays or growing mats required. Just a jar, some water, and a bit of time. In 2–4 days, you’ll have a fresh, living product rich in vitamins and minerals.
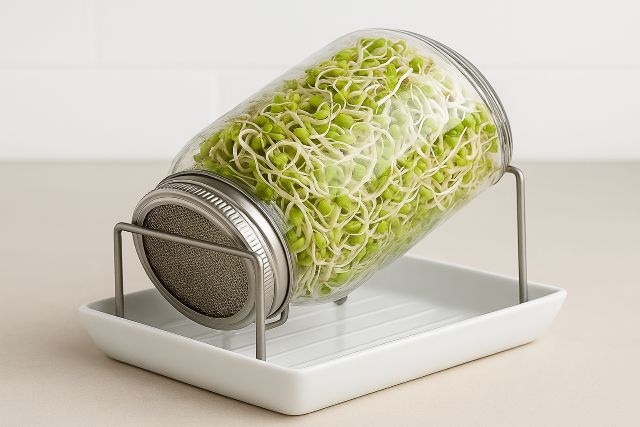
The seeds sprout after being soaked and rinsed twice a day. In a few days, a tiny shoot appears — and the sprouts are ready to eat. They are consumed whole, including the root. You can add them to salads, sandwiches, smoothies, sprinkle them over porridge, or stir them into soup.
Beans and legumes sprout very well in jars: peas, mung beans, lentils, chickpeas, adzuki beans, as well as fenugreek, broccoli, clover, and alfalfa seeds.
The benefits of sprouts go beyond how quickly they grow. This is a way to get living food without any equipment. Another advantage — no fertilizer needed: in such a short growing time, the seed itself contains all the microelements required. You know exactly what seeds you used, what water you added, and how often you rinsed them (you need to rinse every 12 hours). You’re eating a product where the enzymes are still active and the vitamins are preserved — because it all grew right in front of your eyes, at home.
How to Prevent Fruit Flies
- Rinse sprouts twice daily, thoroughly — this prevents the buildup of slime and odors that attract flies.
- Keep jars away from fruit, especially bananas and grapes.
- Cover jars with mesh or cheesecloth — never leave them open, even briefly.
- Refrigerate overnight if flies have already appeared — this can help stop them from multiplying.
- Place a fan nearby (even on low setting) — fruit flies dislike moving air.
- If the jar develops an unpleasant odor or film, discard the batch without hesitation.
- After each batch, wash the jar and lid with vinegar or scald with boiling water.
- To trap flies, place a small jar nearby with apple cider vinegar and a drop of dish soap.
Stages of Growing Sprouts
- Soaking the seeds: place seeds in a clean glass jar and cover with filtered water. Let them soak for 6–12 hours, depending on the type. Soaking triggers the germination process and softens the seeds.
- Rinsing and draining: drain the water through cheesecloth or a sieve, and rinse the seeds well. Place the jar at an angle (e.g., in a bowl) to allow excess water to drain.
Important: Avoid water stagnation. - Sprouting without light: keep the jar at room temperature, in a shaded or dark place.
Rinse the seeds twice a day (morning and evening), then drain again. Repeat until sprouts appear. - Ready to harvest: in 2–5 days (depending on the crop), you’ll see white tails 1–2 mm long or more — the sprouts are ready. Some varieties can be left longer if you prefer a more elongated sprout.
- Final rinse and storage: rinse the finished sprouts, pat dry on a paper towel, and store in a container in the fridge for 2–3 days.
It’s best not to seal them tightly so they don’t “suffocate.” - Cleaning your equipment: after use, wash the jar thoroughly, preferably with vinegar or soap, to remove any residue or slime. This helps prevent odors and extends the shelf life of future batches.
This is truly the simplest way to grow living food — with minimal effort and maximum reward. And from here, you can move on to growing microgreens.
Conclusion
Microgreens are a simple way to grow fresh food at home without much cost or effort. Daily care takes very little time, equipment is minimal, and the result is nutrient-rich greens full of vitamins, minerals, and antioxidants. They grow quickly, can be harvested as needed, and used immediately — with no storage or nutrient loss.
Unlike store-bought greens, homegrown microgreens are not treated with chemicals, not transported over long distances, and don’t lose their properties while sitting on a shelf. You know exactly what seeds you used, how they were watered, and when they were harvested. It’s not only cost-effective — it gives you confidence in the quality.
You can start small — with just a couple of trays, or even a jar of sprouts. Within days, you’ll see results that bring variety and vitality to your daily meals.